Showing posts with label computer. Show all posts

Monday, February 18, 2013

Cara Edit Gambar Wajah Lebih Cerah Alami via Adobe Photoshop

13 comments
Pernah melihat beberapa cover majalah yang berbeda dengan model dan pose yang sama, tetapi warna kulit si model sampul berbeda-beda?

Sebelumnya tim desainer majalah tentu mengedit terlebih dahulu warna kulit si model supaya tidak kelihatan sama dengan majalah lain yang menggunakan model yang sama.

Biasanya perubahan warna tersebut dalam rangka penyesuaian dengan tema warna yang diusung sampul majalah yang bersangkutan. Kulit si model pun dipermak, dibuat lebih cerah dari aslinya atau malah sebaliknya, diedit hingga tampak seperti habis berjemur matahari alias tanned.

Ingin kulit wajah atau badan di foto kelihatan lebih cerah atau tanned dalam sekejap? Cukup ikuti langkah-langkah berikut ini:

Buka file foto yang akan diedit di Adobe Photoshop. Klik kanan pada layer Background dan klik Duplicate Layer. Zoom in foto hingga area wajah (serta tubuh, bila ada kulit tubuh yang terlihat) tampak lebih fokus dan detail.

Kemudian klik Quick Mask Mode, klik Brush Tool dan pilih kuas berukuran sedang (pilih kuas berukuran kecil untuk mewarnai area yang susah dijangkau, seperti tepian-tepian dekat rambut, telinga, bibir atau mata).

Kini mulai warnai area kulit yang akan diubah warnanya, kulit yang diseleksi akan ditutupi tinta merah seperti pada gambar.

Seleksi

Lalu klik Quick Mask Mode untuk mengaktifkan mode seleksi (tinta merah hilang dan berubah menjadi garis putus-putus). Klik Rectangular Tool, klik kanan dan pilih Select Inverse. Berikut panduan pemilihan warna kulit:

  • Efek mencerahkan: pilih warna kulit yang paling cerah atau medium dalam foto untuk diaplikasikan ke seluruh kulit.
  • Efek menggelapkan (tanned): pilih warna kulit yang sedikit agak gelap, warna yang paling gelap akan kelihatan berlebihan.
Contoh di bawah ini merupakan hasil dari efek mencerahkan.

Berlebihan

Gambar di bawah ini merupakan contoh efek menggelapkan yang sedikit berlebihan, hasilnya kulit kelihatan dusty dan tidak natural.

over

Pada gambar di bawah ini bisa dilihat contoh efek menggelapkan yang cukup sehingga efek kulit tanned pun bisa kelihatan.

Tanned

Hasilnya pengeditan warna kulit pada berbagai jenis warna asli bisa dilihat pada gambar di bawah ini.

ABC Family's Winter Wonderland Party Celebrating the Network's Annual '25 Days of Christmas'

hasil Akhir

Penutup

Warna kulit yang cerah memang dambaan setiap wanita (dan juga pria beberapa dekade belakangan), meski demikian tetap aplikasikan warna senaturan mungkin. Selamat mencoba.

Original article: Cara Mudah Mengubah Warna Kulit dengan Photoshop2013 Bisa Komputer. All Rights Reserved. Sumber:detik.com

Tuesday, January 8, 2013

Download Connectify Pro 3.7.1 Full Serial Number + License Key

4 comments
Setelah googling akhirnya dapet juga serial number yang valid sama download Connectify Pro 3.7.1 Full Serial Number + License Key versi terbaru dari blognya okta sharing center. Ketika versi Pro diaktifkan maka NO Ads alias tidak ada iklan yang sering muncul mengganggu kita.

Software Connectify versi terbaru ini sangat berguna jika kita cuma punya satu modem namun ada beberapa device(Android, BB, Iphone, Laptop lain) yang mau internetan juga, software tersebut yaitu Connectify Pro 3.7.1 Full Serial Number + License Key.

Seperti yang sudah saya jelaskan diatas, Connectify Pro 3.7.1 Full Serial Number + License Key ini dapat membagi suatu koneksi internet melalui WiFi, jadi salah satu syarat untuk make software ini Server ataupun Client harus punya WiFi. 

Connectify Pro versi 3.7.1 ini cocok/compatible untuk Windows XP, Windows Vista, Windows 7, Windows 8.

Download :
ScreenShot : 
tampilan saat wifi telah aktif dengan satu client tersambung
Penting:
  • Pastikan Network Card anda support dengan Connectify 3.5.1 | Cek DISINI (Jika bingung langsung coba aja, kalo gak bisa/gak detect berarti belum support, hehehe)
  • Pastikan Firewall anda tidak memblokir Connectify (Bagi yang menggunakan ESET Smart Security harus di disable dulu Firewall nya agar sinyal WiFi dari Connectify terdeteksi oleh device lain)
  • Disconnect internet sebelum memasukkan Serial Number 
Terima kasih, Semoga bermanfaat.

incoming from google :
Download Connectify 3.7.1 versi terbaru, connectify license key windows 8, connectify wifi serial number download, connectify support windows 7, connectify full version, connectify support windows xp, connectify free download versi terbaru windows 8

Wednesday, December 26, 2012

SAS Statistical Analysis System Software v 9 Portable Download + Tutorial

5 comments

URL magnet torrent silakan diunduh Click Here
Tutorial  Lengkap tentang SAS untuk pemula
1. http://galsterhome.com/stats/Tutorial/sas_tutorial_contents.htm (semua tentang SAS diulas disini, bahkan dari definisi apa itu SAS, cocok bagi beginner)
2. www.student.math.uwaterloo.ca

Saturday, June 30, 2012

Bagaimana cara menghapus iklan pop up yang mengganggu?

60 comments
Seringkali ketika mengunjungi sebuah situs atau blog, kita dikejutkan iklan pop up ads window yang tiba-tiba muncul yang tentu saja membuat kita terganggu. Apalagi kalau iklan pop up ini muncul di website/blog kita. Lalu bagaimana cara menghilangkan pop up ads yang sangat mengganggu pengunjung ini?

Pop Up Windows adalah website yang tiba-tiba muncul bersamaan di browser pada halaman sendiri, ketika sahabat mengakses sebuah halaman blog yang menyimpan hidden script pop up. Beberapa kalangan menganalisa bahwa pop up ads bisa dicurigai sebagai spyware bin malware, nah khusus menangani masalah pop up ads hyperpromote yang biasanya muncul di beberapa website/blog, berikut ini penjelasannya.

1. Analisa Asbabun Nuzul
Mengapa Sebuah pop up tertentu muncul dalam suatu blog/website?
Hal ini terjadi disebabkan oleh blog memasang widget script yang sengaja menyelipkan script berupa timer yang akan memunculkan alamat link blog atau website tertentu
Nah dari beberapa widget eksternal yang sering saya jumpai, persembunyian pop up berada pada area akhir baris widget yang diapit dengan kode .
Beberapa contoh widget yang menyimpan pop up ads adalah widget dari widgeo dan widget pagerank dari rankwidget.com.  Kalau sahabat masih memasang widget tersebut dan ingin menghilangkan efek pop up adsnya silahkan hapus kode script mulai text
Sedangkan Pop up Ads Hyperpromote adalah pop up ads yang menempel pada kode script ppc iklan bidvertiser, hal ini terjadi karena anda sendiri yang menyetujui akan keberadaannya.

2. Remove Pop Up Ads Hyperpromote
Pop Up Hyperpromote  ini kalau tidak salah hanya muncul satukali selama 24 jam, kalau sahabat ingin menghilangkan efek pop up ads tersebut silahkan ikuti langkah berikut ini:
Login ke publisher account bidvertiser anda, pada tab menu ‘Manage Bidvertisers’
Klik Option Radio Button di sebelah kiri link blog sahabat
kemudian dibawahnya terdapat ‘Preferences’ button, klik sehingga muncul menu seperti image berikut ini:

pada ‘Display Pop-Under Ads’, pilih ‘No’,
kemudian klik button ‘Update’
Kalau anda ingin menghilangkan secara lebih praktis,
tinggal login ke account wordpress-appearance, widget
kemudian buang saja script bidvertisernya,
gampang kan seperti yang telah kulakukan hari ini he he

3. For Cyber Surfer
Remove Pop Up Ads Hyperpromote |  wordpress widgeo tips script untuk menghilangkan iklan pop up script remove pop up ads remove ads web dengan script php pop up windows adalah menghilangkan popup bidvertiser menghilangkan iklan yang tiba tiba muncul di wordpress hyperpromo cara menghilangkan iklan pop up pada browser cara membuang pop up di web at.ua block pop up windows
Sebagai pengguna, jika anda ingin mencoba meminimalisir kemunculan pop up windows yang muncul pada saat melakukan surfing menggunakan browser Firefox, silahkan anda klik menu:
Tools-Options, pilih tab ‘Content’
checkmark pada ‘Block Pop-Up Windows‘,  kemudian OK
Demikianlah tips mudah untuk mengantisipasi pop up windows dengan keyword Remove Pop Up Ads Hyperpromote


Incoming from Google :
    cara menghilangkan pop up ads windows di blog, menghilangkan pop up, menghilangkan ad yieldmanager com, cara membuang ad yieldmanager com, how to remove pop up ads windows
source : alkatro.com

Friday, June 15, 2012

Cara Instal Modem Express Card ONDA EH501HS (ZTE MF335) di Windows 7

9 comments
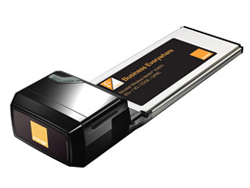
Modem Express Card ONDA EH501HS adalah modem GSM yang juga dikenal dengan nama ZTE MF335. Tidak seperti modem GSM kebanyakan yang menggunakan port USB sebagai konektivitas, modem ini menggunakan slot express card yang ada di hampir semua laptop baru. Lumayan, bisa hemat USB port. Modem ini sendiri saya beli tahun lalu di jakartanotebook.com, dan selama setahun ini saya belum bisa menggunakannya karena masalah pada slot SIM card nya, tidak bisa mendeteksi sim card yang saya masukkan. Sudah saya coba dengan hampir semua operator GSM, tetap tidak kedetect. Mau komplain, males rasanya.

Tapi beberapa hari lalu iseng saya coba lagi dan ternyata berhasil. Jadi, mungkin dulu salah menginstal driver, karena memang serinya ada banyak, seperti Onda EH50xH misalnya.

Berikut saya share tahapan bagaimana cara menginstal modem Express Card ONDA EH501HS (ZTE MF335) yang saya coba pada OS Windows 7 di Acer Aspire 2930 saya.

1. Download Driver ONDA EH501HS (ZTE MF335), baru dapat juga setelah googling sana sini.
2. Ekstrak file Onda_EH501HS_Driver_Win7.zip dalam suatu folder.

3. Double Click Setup.exe

4. Ikuti instruksi selanjutnya sampai finish.

5. Pasangkan modem ke slot express card pada laptop.

6. Buka software Connessione EH501HS berlogo icon Tri.
Ingat, software modem ini tidak autorun, jadi harus kita buka secara manual.

7. Jika proses instalasi benar dan sim card terdeteksi, maka lampu indikator pada modem yang sebelumnya berwarna merah akan berubah menjadi hijau dan muncul signal bar, network type dan operator pada tapilan software.
Berikut gambar user interface software Connessione EH501HS

8. Selesai.


incoming from google :
cara instal modem gsm zte mf335, cara instal onda EH501HS, free download driver zte mf335, driver zte mf335 windows 7, onda eh501hs driver download, driver onda windows 7 install, how to instal expresscard gsm modem

Saturday, March 17, 2012

Cara menambah Add On IDM pada Mozilla Firefox 11

5 comments

Add ons IDM CC untuk Firefox 11 adalah add ons dari Internet Download Manager yang bisa dipasang dan diintegrasikan pada Mozilla Firefox 11. Add ons IDM CC yang bisa diintegrasikan pada Firefox 11 adalah add ons IDM CC 7.3.11. Apa kegunaan dari add ons IDM CC adalah untuk mengintegrasikan fungsi IDM pada browser Mozilla Firefox, sehingga kita bisa melakukan download file di situs-istus yang sedang kita akses dengan menggunakan IDM. Apabila hendak mendownload video atau musik, maka ketika kita membuka situs video dan musik tersebut otomatis akan terlihat icon segita hijau IDM di sudut player video atau musik tersebut. Apabila kita hendak melakukan download file, software, game, aplikasi, antivirus dan sebagainya, maka ketika kita mengklik tombol download di situs tersebut program IDM akan otomatis mendownloadnya. Sebagaiamna kita ketahui, bahwa melakukan download file menggunakan IDM akan terasa lebih cepat beberapa kali lipat dan juga lebih praktis dibandingkan menggunakan standar download dari browser.

Browser Mozilla Firefox 11 adalah versi terbaru dari Mozilla Fiefox yang tentunya lebih powerfull dan lebih bagus kinerjanya dari Mozilla Firefox versi sebelumnya. Ada 2 cara untuk mendapatkan Mozilla Firefox 11 yaitu dengan download langsung di situs Mozilla, maupun dengan melakukan upgrade / update Mozilla dari versi yang sekarang sedang kita pakai. Untuk men-download Mozilla Firefox 11 silahkan Anda klik link ini.

Setelah kita mendapatkan browser Mozilla Firefox 11, maka tips atau cara untuk mengintegrasikan add-ons IDM CC 7.3.11 pada Mozilla Firefox 11 adalah dengan memperhatikan beberapa hal berikut ini :

1. Komputer telah ter-install dengan IDM (Internet Download Manager), apabila belum silahkan download IDM versi terbaru di sini.

2. Apabila pada Mozilla Firefox versi sebelumnya sudah terinstall dan terintegrasi dengan add-ons IDM CC, maka Anda hanya perlu melakukan upgrade Mozilla Firefox ke versi terbaru, dan setelah proses update Mozilla selesai add ons IDM CC akan berfungsi otomatis seperti biasanya
.
3. Apabila pada Mozilla Firefox versi sebelumnya sudah terinstall IDM tetapi belum terintegrasi dengan add-ons IDM CC, maka setelah melakukan upgrade Mozilla Firefox ke versi terbaru Anda integrasikan Add ons IDM CC ke Mozilla dengan cara buka browser dan paste alamat link di bawah ini :

4. Lalu Anda ikuti tampilan yang keluar di layar untuk melakukan instalasi add-ons IDM CC, yaitu klik IDM CC, lalu klik Install Now dan tunggu sampai Anda diminta untuk restart Mozilla Firefox. Lihat gambar berikut ini :
install-add-ons

Setelah restart Firefox, Anda pastikan add-ons IDM CC 7.3.11 menjadi Enable, cek di  Tools > Add-ons > IDM CC 7.3.11

5. Apabila langkah-langkah di atas berhasil Anda lakukan, maka sekarang browser Mozilla Firefox 11 Anda telah terintegrasi dengan add ons IDM CC. Untuk mengetahuinya, cukup Anda buka sebuah website kemudian klik kanan pada page website itu dan akan terlihat gambar IDM yang telah terintegrasi dengan Mozilla Firefox 11. Lihat gambar di bawah ini
idm-add-ons

Demikianlah tips atau cara meng-integrasikan dan memasang add ons IDM CC 7.3.11 untuk Mozilla Firefox 11. Semoga bermanfaat.


sumber: http://memikatcahaya.com

Thursday, November 10, 2011

Cara Mengubah/Mengonvert File dari PDF ke DOC

2 comments

Diantara sekian banyak software konverter pdf to doc, ada software konverter yang terbaik dan recomended bagi kita yang ingin mengubah file dari pdf ke doc. Software pdf to doc ini adalah Nitro PDF Profesional, memang ukuran file installernya 40 kali lipat jika dibanding pdf to word doc pada hellopdf.com yang hanya sekitar 1MB. Oleh karena itu saya ingin share software Nitro PDF Profesional yang hanya 23MB, ini linknya http://www.mediafire.com/?ot7afdsj43dpif7.

Caranya pun sangat mudah, tinggal open file untuk memasukkan file yang ingin dikonvert, kemudian klik "to word' atau "to excel" jika ingin diubah dalam bentuk .xls.

Saya jamin tidak akan menyesal jika mendownload software tersebut, karena hasil .doc nya akan sama persis dengan file PDF yang asli, tidak berubah sedikitpun. Berbeda dengan software pdf to doc lain yang biasanya menghasilkan file doc yang hanya teks, bahkan beda font yang hasilnya justru mengecewakan.

Apa arti OEM?

3 comments
Setelah membaca spesifikasi suatu produk pada salah satu situs diskon, saya menemukan kata yang membuat saya tertarik untuk mencari tahu artinya. Memang sih, tertulis kepanjangannya disitu OEM (Original Equipment Manufacture), tapi kurang puas rasanya kalau tidak searching di mister Google untuk menemukan maksud dan pengertian dari kata tersebut. Tanpa basa basi langsung klik situs yang tampil di page one Google barisan atas, dapatlah arti dari OEM. 

OEM atau “Original Equipment Manufacturer” adalah salah satu istilah yang digunakan untuk menggambarkan produk yang datang satu paket dari produsen. Pengertian OEM secara umum adalah perusahaan yang membuat produk untuk pihak lain untuk dikemas ulang dan jual. Reseller  membeli produk OEM dalam jumah besar TANPA kemasan mahal yang biasanya dipakai dalam setiap produk.
 
Intinya, produk OEM adalah SAMA dengan produk ORIGINAL serupa yang dikemas secara bagus ( Kemasan Ritel ). Istilah OEM banyak dipergunakan dalam industri dan yang paling banyak adalah dalam dunia Industri elektronik ( Laptop, Komputer, Printer, Ponsel, Software dan lainnya ).

Jadi OEM adalah produk ORIGINAL tanpa kemasan mewah. Yang harus diperhatikan dalam membeli produk OEM adalah ketelitian karena banyak sekali produk palsu yang mengaku sebagai ORIGINAL.

Jika OEM mau dikemas sebagai retail, maka di kemasan tersebut harus dicantumkan SKU (Stock-Keeping Unit) dari produk original tersebut baik tipe, model dan pengkodean (SKN, ASY, HDW, barcode dan sebagainya) yang menenjukkan secara spesifik satu produk secara unik, bukannya satu kode yang sama untuk semua tipe dan warna.


sumber : komputer-fix.blogspot.com

Monday, July 4, 2011

How To Recognize A Font? A Mini Guide To Successful Font Recognition

1 comments
Website developers and graphic designers are often asked by the client to hunt down the font they are thinking of. Without a name, finding a particular font can be very difficult. But if you have a font sample, the job is made slightly easier. In this case you can use a number of techniques to identify the font.
Mainly the font recognizing techniques involve three types of methods: internet identification tools, print catalogs, and other developers.
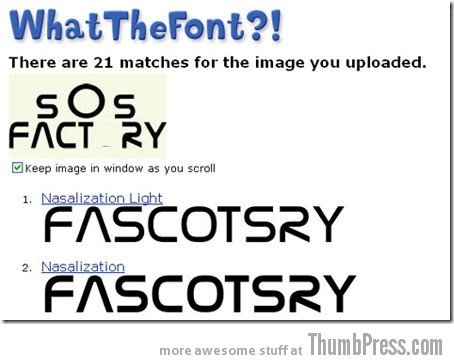
When it comes to internet identifications tools, one of the best is “What the Font!” This font identification engine does a wonderful job of finding a typeface. In the rare case that it fails in doing so, it refers you to typeface forums where online typographers can help you recognizing the font.

clip image001 thumb3 How to Recognize a Font

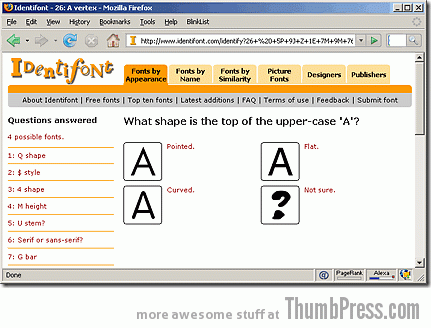
But that is for cases when you have a font image. If you only have a memory of the font, then try out Identifont. This online tool asks you 20 questions about the appearance of the font you are looking for. With each question the search is narrowed down and font suggestions are displayed in the end.

clip image002 thumb2 How to Recognize a Font

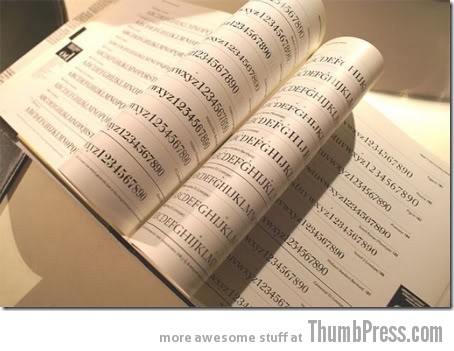
Also, if you have the font’s image memorized and can recognize it again if you were to see it, the print catalogs can be a great help. Simply open up a font catalog and start flipping through the pages. For this the most helpful is perhaps Rookledge’s International Type Finder.

clip image003 thumb3 How to Recognize a Font

Finally if all fails, then see if fellow designers and typographers on the web can help you out. Perhaps you remember seeing the font on a certain website and your online colleagues remember which site it was. There is no harm in trying.
Combined, these three techniques will definitely help you find the desired font.

Wednesday, June 29, 2011

Free Up Disk Space By Finding And Deleting Duplicate Files In Windows

1 comments
Are you worried that you might have duplicate files hoarding up hard drive space on your computer? If yes, then do not bother manually searching for those suspected duplicates. Doing so manually can be grossly time-consuming and even inefficient.
One of the best free solutions out there to check for duplicate files is Duper.
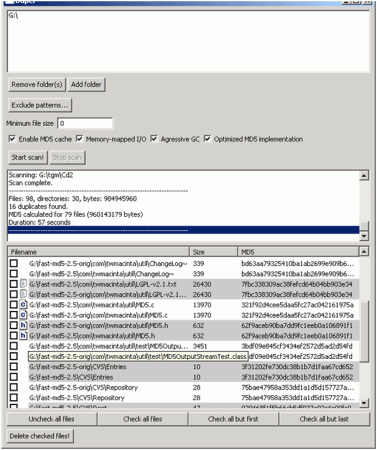
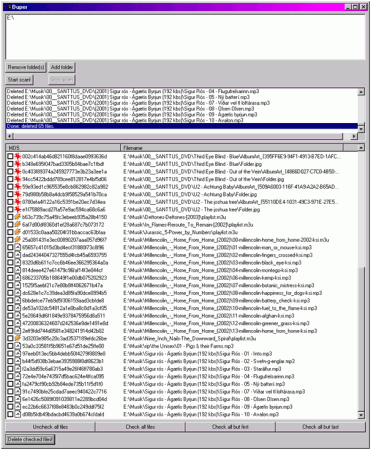
Duper is a freeware program that runs in Java; the only requirement is to have Java installed whether you are running Mac OS, Linux, or Windows. Once we add the directories-to-be-searched in Duper, it looks for files with identical file sizes. For each group of files with the same size, an MD5 sum is computed and then used to determine if they are identical.
duper 377x450 Free Up Disk Space By Finding And Deleting Duplicate Files In Windows
This second check is what determines whether the files are truly identical or not. The user is then notified of the number of detected identical files.
duper1 450x95 Free Up Disk Space By Finding And Deleting Duplicate Files In Windows
We can then choose to delete the duplicates or keep them as they were.
duper2 371x450 Free Up Disk Space By Finding And Deleting Duplicate Files In Windows
The program’s options can be modified before executing any searches to change the level of detection.
Overall, Duper is a great freeware duplicate file detection solution and will serve most users very well.

Saturday, November 27, 2010

Eset nod32 id, Eset Smart Security update, ESS username and password, eset nod32 keys for version 3,version 4 update 5206, 5207, 5208, 5209, NOD32 latest escalation ID [27 November 2010]

9 comments

Username: EAV-38564017
Password: bjauu2n5ba
For versions: ESS / EAV

Username: EAV-38564018
Password: nrh4usnb3p
For versions: ESS / EAV

Username: EAV-38564020
Password: udhxnm224j
For versions: ESS / EAV

Username: EAV-38562232
Password: dnebe8pn78
For versions: ESS / EAV

Username: EAV-38390693
Password: cck22mupv4
For versions: EAV
Expiry :2011 -05-30

Username: EAV-38390781
Password: jx6sxnen7p
For versions: EAV
Expiry :2011 -05-30

Username: EAV-38390620
Password: ha8s7juef4
For versions: EAV
Expiry :2011 -05-30

Username: EAV-38381248
Password: 8bj4unhtdh
For versions: EAV
Expiry :2011 -05-30

Username: EAV-38381263
Password: t3d4sudtfa
For versions: EAV
Expiry :2011 -05-30

Username: EAV-38381245
Password: neb3347xm8
For versions: EAV
Expiry :2011 -05-30

Monday, November 22, 2010

The Coolest Adobe Photoshop Effect 2010 Tutorials for AP CS 3, 4, and 5

3 comments
Inilah Tutorial Pembuatan Efek Photoshop Paling Keren. Untuk versi Adobe Photoshop yang digunakan bisa Adobe Photoshop CS 3, CS 4 dan CS 5.
Tutorial : Stop Haunt Me Every Day [ SHMED ]


Step 1
In Photoshop, open girl_portrait. jpg from the right (or the cover CD on the magazine). Create a new adjustment layer, and select the Levels (Cmd/ Ctrl + L). Set the Output Level white to 130.


Step 2
Open neon lines_1.jpg, and use the Hue/ Saturation controls to make it black and white. Use the Rectangular Marquee tool to select one of the lines.


Step 3
Using the Move tool (V), drag this selection to girl_portrait.jpg. Change the blending options to Screen. Transform the layer using Cmd/Ctrl + T, and start to rotate it. Right-click (Cmd + click) to choose the Warp tool.
Step 4
Now you’ll see a six-section grid section on the layer, which allows you to move every section or every point. Let’s move it so it matches the one seen here. Click Enter when done, and add a layer mask onto the layer. Start brushing the layer mask, by using black to erase. For a smooth effect, try setting the Brush Opacity to 10 per cent.


Step 5
Duplicate the latest layer by hitting Alt+Cmd/Ctrl+J. Start painting the layer mask by using black to erase, again setting the brush opacity very low. Select both layers and merge them (Cmd/Ctrl+E); don’t be surprised by the black areas. Change the blending options to Linear Dodge and repeat this until the girl is entirely outlined.


Step 6
Still using the same selection from neon lines_1.jpg, start warping again, using this image as an example, using the warping position to trace the detail on the ear. Duplicate this layer, place the shading of the ear and start warping again.


Step 7
Now for the hair. Import the selection from neon lines_1.jpg again, change the blending options to Screen and try warping it so that it looks like the above right image. Use the Eraser tool to take out any unwanted lines. Duplicate the layer – we’ll still need this layer for another part of the hair. Start warping around this layer to fill in the hair. 


Step 8
Open neon lines_2.jpg and make a new selection (see Step 02) to fill the body section. Don’t forget to set the blending option to Screen, and start warping again around this layer. On this layer, add a layer mask to erase unwanted sections of the image.


Step 9
Duplicate the layer (Cmd/Ctrl + J) and start warping once again. Repeat this process until the black areas have been reduced. Select the layer on the body section and merge the layers. Layer mask to erase unwanted sections, and set the layer’s opacity to 70 per cent.


 Step 10
Let’s fill in the face. Return to neon lines_2.jpg and make a different selection. Copy this into the main image over the face and start warping again, starting around the nose. Duplicate the layer, move it to the side slightly and continue warping. Merge the layers.


Step 11
Now it’s time to start adding colour. Merge all of the warp layers together (not forgetting to set the blend mode to Screen). Add an adjustment layer, selecting Gradient. Let’s set the gradient from dark blue to bright blue, set Style to Linear and Angle to 180°. Make another Adjustment Gradient, this time merging from medium green to bright green.


Step 12
Customize the colour by making individual adjustment curves. Adjust the Red, Green and Blue channels individually, rather than adjusting the RGB marker.

Step 13
To create the particle effect, make a selection from neon lines_2.jpg and start warping outside the figure. Open neon lines_3.jpg and make a selection; place this over the girl’s hand. I also added some particle effects on the final images, on a new layer, using the Brush tool. Set the brush’s Tip Shape, check the Shape Dynamics and set the Size Jitter to 100 per cent. Check the Scattering, and set Scatter to 1,000 per cent. Now start brushing the layer in smooth lines, varying the size of the brush. When you’ve finished brushing, add a mask to erase unwanted particles.


The Final Result


Saturday, November 20, 2010

How to Upgrade Firmware Novatel Merlin XU870 3G HSDPA 3.6 ExpressCard Modem to 7.2 Mbps Support (Updated)

96 comments

7.2 Mbps support !
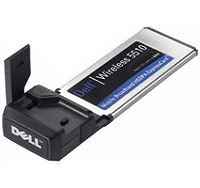
(for your Novatel Wireless Merlin XU-870 or your DELL Wireless 5510)

Novatel Merlin XU870 and DELL Wireless 5510

What do my tutorial for you ?
> Add the 7.2 Mbps support for your Novatel Wireless Merlin XU-870 or your DELL Wireless 5510 card
> Use your DELL card on a x64 bits laptop!

History
The 7.2 Mbps firmware for the XU-870 (or DELL Wireless 5510) was very hard to find! I spent many nights googling the web to find it. After find this firmware I was disappointed because the Novatel Wireless Merlin updater doesn't want to flash my DELL branded card. So I decided to find a way to update my fuc**g 3G card. If you have an x64 laptop and a DELL card I think you will be happy to know that DELL don't provide ANY 64 bits drivers (One more reason to debrand you DELL card!)

For information :
Making bad operations on your card can brick your device!
I am not responsible of your ACTS!

>How-to upgrade your XU-870 to 7.2 Mbps?
>How-to upgrade your DELL Wireless 5510 to 7.2 Mbps ?
>Donate

Upgrading the Merlin XU-870
Upgrading your Novatel Wireless Merlin XU-87 branded 3G card is as easy as download this file :-) :
NVTL_PUU_800_FW101.9.00_PkgB.exe

Upgrading the DELL Wireless 5510 to 7.2 Mbps
For a XU_870 you can use directly the 101.9.00 firmware updater but for the DELL there is no way! We can't upgrade the card with the same firmware update! So we use the old firmware updater (version 9.5.03) to flash the new 7.2 Mbps firmware. For this we have to swap two files during the upgrade
processes.

Upgrading a XU-870 branded by DELL is more complicated. You have to follow this tutorial to flash and debrand your DELL Card. After this, your card will be recognize like an Novatel Wiresll Merlin XU-870 card.

Download the following file :
NVTL__FUU_800_9.5.03_S1.exe
The original firmware installer for Merlin XU-870 ver 9.5.03
U800.nvtb
The extracted 7.2 Mbps firmware
XU870.cache
The configuration file
The Novatel Drivers
The Novatel Wireless Merlin drivers

This is step by step to upgrade your firmware:

1. Download and install first the Novatel driver for the card.
You can download for free newest software and driver MobiLink Connection Manager and Driver Installer for
Windows Vista and Windows 7, 32 & 64 bit, (because link at the official website has been removed). Download MobiLink Manager Driver Novatel Merlin XU870.rar on below
rapidshare.com/files/4041567138.
 

2. Download Upgrade 7.2 Mbps Toolkit . Launch the NVTL__FUU_800_9.5.03_S1.exe installer, you will see this screen (sorry I'am French as you can see on the update's screenshot)


Don't click on "Next"
3. Go to the temp folder (On my Windows Vista : C:\Windows\temp). You will see an "U800.nvtb", this is the old firmware. So replace the 10,5 MB "U800.nvtb" files by the 12,9 MB "U800.nvtb" files you've downloaded from this website.


4. Now click on "I Accept" and "Next"


The disclaimer screen

5. The modem is controlled


6. At this point the modem's configuration is saved


7. At this point the new firmware is written on the 3G card.


In the temp folder you will see a new *.cache file. Replace the "*.cache" files by the "XU870.cache" files you've downloaded from this website. So take my *.cache file and rename it with the same name than the old one (here : L7101106001991_001.cache).


The configuration file contain all information about the device except IMEI. So The branded information are stored in this file. So restoring my *.cache file will debrand your DELL card to be an original Merlin XU-870

8. At this point the configuration is restored on the card


Restoring modem's configuration... Please Wait

9. The modem is restarted and the wizard is ended


The card is updated !

After this your laptop will recognize your DELL Wireless 5510 as a Novatel XU870 card

10. Reflash the card a second time (restart at number 2 of the tutorial).

That's ALL !

If your are happy with my work you can donate :