Showing posts with label tips dan tutorial. Show all posts

Saturday, June 30, 2012

Bagaimana cara menghapus iklan pop up yang mengganggu?

60 comments
Seringkali ketika mengunjungi sebuah situs atau blog, kita dikejutkan iklan pop up ads window yang tiba-tiba muncul yang tentu saja membuat kita terganggu. Apalagi kalau iklan pop up ini muncul di website/blog kita. Lalu bagaimana cara menghilangkan pop up ads yang sangat mengganggu pengunjung ini?

Pop Up Windows adalah website yang tiba-tiba muncul bersamaan di browser pada halaman sendiri, ketika sahabat mengakses sebuah halaman blog yang menyimpan hidden script pop up. Beberapa kalangan menganalisa bahwa pop up ads bisa dicurigai sebagai spyware bin malware, nah khusus menangani masalah pop up ads hyperpromote yang biasanya muncul di beberapa website/blog, berikut ini penjelasannya.

1. Analisa Asbabun Nuzul
Mengapa Sebuah pop up tertentu muncul dalam suatu blog/website?
Hal ini terjadi disebabkan oleh blog memasang widget script yang sengaja menyelipkan script berupa timer yang akan memunculkan alamat link blog atau website tertentu
Nah dari beberapa widget eksternal yang sering saya jumpai, persembunyian pop up berada pada area akhir baris widget yang diapit dengan kode .
Beberapa contoh widget yang menyimpan pop up ads adalah widget dari widgeo dan widget pagerank dari rankwidget.com.  Kalau sahabat masih memasang widget tersebut dan ingin menghilangkan efek pop up adsnya silahkan hapus kode script mulai text
Sedangkan Pop up Ads Hyperpromote adalah pop up ads yang menempel pada kode script ppc iklan bidvertiser, hal ini terjadi karena anda sendiri yang menyetujui akan keberadaannya.

2. Remove Pop Up Ads Hyperpromote
Pop Up Hyperpromote  ini kalau tidak salah hanya muncul satukali selama 24 jam, kalau sahabat ingin menghilangkan efek pop up ads tersebut silahkan ikuti langkah berikut ini:
Login ke publisher account bidvertiser anda, pada tab menu ‘Manage Bidvertisers’
Klik Option Radio Button di sebelah kiri link blog sahabat
kemudian dibawahnya terdapat ‘Preferences’ button, klik sehingga muncul menu seperti image berikut ini:

pada ‘Display Pop-Under Ads’, pilih ‘No’,
kemudian klik button ‘Update’
Kalau anda ingin menghilangkan secara lebih praktis,
tinggal login ke account wordpress-appearance, widget
kemudian buang saja script bidvertisernya,
gampang kan seperti yang telah kulakukan hari ini he he

3. For Cyber Surfer
Remove Pop Up Ads Hyperpromote |  wordpress widgeo tips script untuk menghilangkan iklan pop up script remove pop up ads remove ads web dengan script php pop up windows adalah menghilangkan popup bidvertiser menghilangkan iklan yang tiba tiba muncul di wordpress hyperpromo cara menghilangkan iklan pop up pada browser cara membuang pop up di web at.ua block pop up windows
Sebagai pengguna, jika anda ingin mencoba meminimalisir kemunculan pop up windows yang muncul pada saat melakukan surfing menggunakan browser Firefox, silahkan anda klik menu:
Tools-Options, pilih tab ‘Content’
checkmark pada ‘Block Pop-Up Windows‘,  kemudian OK
Demikianlah tips mudah untuk mengantisipasi pop up windows dengan keyword Remove Pop Up Ads Hyperpromote


Incoming from Google :
    cara menghilangkan pop up ads windows di blog, menghilangkan pop up, menghilangkan ad yieldmanager com, cara membuang ad yieldmanager com, how to remove pop up ads windows
source : alkatro.com

Thursday, June 14, 2012

Cara dan Tahap Mendaftar/Registrasi Internet Banking BNI

5 comments


Saat ini, punya internet banking adalah suatu kewajiban. Dengan berkembangnya internet, maka berkembang pula lah jual beli online. Transaksi nya pun tidak menggunakan uang fisik, namun sudah mulai beralih ke sistem online. Oleh karena itu semua bank berlomba untuk menyediakan fitur internet banking, termasuk BNI. Berikut tahap step by step bagaimana cara untuk mulai mendaftar Internet Banking BNI. 

Cara mudah mengaktifasi BNI Internet Banking :
  • Lakukan Registrasi melalui ATM menggunakan kartu ATM BNI anda, pilih menu ”Registrasi E-Channel”, dan buat 6 angka PIN Registrasi BNI Internet Banking 
  • Lakukan Aktivasi BNI Internet Banking, dengan cara :
    • Buka www.bni.co.id, pilih BNI Internet Banking, atau bisa langsung klik https://ibank.bni.co.id/
    • Pilih Internet Banking PERSONAL, bukan yang Corporate.
    • Untuk pengguna baru, ikuti panduan ”Jika Anda sudah registrasi BNI Internet Banking via BNI ATM, silakan klik di SINI untuk aktivasi”
    • Masukkan 16 angka nomor BNI Card*) dan PIN Registrasi BNI Internet Banking Anda
    • Beri tanda centang pada kotak tanda persetujuan dengan terlebih dahulu membaca Syarat & Ketentuan BNI Internet Banking (kalau tidak malas)
    • Buatlah User ID dan Password Anda sesuai dengan ketentuan format. (mengandung unsur angka dan huruf)
  • Gunakan User ID dan Password Anda untuk login pada Layanan BNI Internet Banking dan langsung dapat melakukan transaksi non finansial seperti informasi saldo dan mutasi rekening.
*)Kartu BNI yang juga bisa dipakai untuk registrasi adalah Kartu Mahasiswa (KTM), Kartu Pegawai/Anggota & BNI Syariah Card.

Selama proses di atas tidak mengeluarkan biaya sepeserpun alias Gratis.

Nah, itulah tahapan cara melakukan registrasi Internet Banking Bank BNI. Tapi tunggu dulu, dengan registrasi saja kita hanya bisa melakukan cek saldo, lihat mutasi rekening, dan fitur/menu lain non transaksi finansial. Untuk bisa melakukan transfer dana, membayar tagihan dan transaksi finansial lainnya, Anda harus memiliki BNI eSecure yaitu alat pengaman tambahan (token) untuk menghasilkan kombinasi angka yang selalu berubah (dynamic PIN).
gambar token BNI eSecure
NB : cara lain untuk mengaktifkan BNI Internet Banking yaitu melalui CS (Customer Service) kantor cabang BNI terdekat dengan membawa ID Card (KTP, SIM) dan Kartu ATM/Buku Tabungan.

Lalu bgaimana cara memperoleh token BNI eSecure?
 
incoming from google :
cara aktivasi BNI internet banking, bagaimana cara mengaktifkan internet banking bank BNI, tahapan registrasi BNI internet banking, cara mendapat username dan password internet banking BNI, cara memperoleh username password BNI inet banking

Thursday, November 10, 2011

Cara Mengubah/Mengonvert File dari PDF ke DOC

2 comments

Diantara sekian banyak software konverter pdf to doc, ada software konverter yang terbaik dan recomended bagi kita yang ingin mengubah file dari pdf ke doc. Software pdf to doc ini adalah Nitro PDF Profesional, memang ukuran file installernya 40 kali lipat jika dibanding pdf to word doc pada hellopdf.com yang hanya sekitar 1MB. Oleh karena itu saya ingin share software Nitro PDF Profesional yang hanya 23MB, ini linknya http://www.mediafire.com/?ot7afdsj43dpif7.

Caranya pun sangat mudah, tinggal open file untuk memasukkan file yang ingin dikonvert, kemudian klik "to word' atau "to excel" jika ingin diubah dalam bentuk .xls.

Saya jamin tidak akan menyesal jika mendownload software tersebut, karena hasil .doc nya akan sama persis dengan file PDF yang asli, tidak berubah sedikitpun. Berbeda dengan software pdf to doc lain yang biasanya menghasilkan file doc yang hanya teks, bahkan beda font yang hasilnya justru mengecewakan.

Monday, July 4, 2011

How To Recognize A Font? A Mini Guide To Successful Font Recognition

1 comments
Website developers and graphic designers are often asked by the client to hunt down the font they are thinking of. Without a name, finding a particular font can be very difficult. But if you have a font sample, the job is made slightly easier. In this case you can use a number of techniques to identify the font.
Mainly the font recognizing techniques involve three types of methods: internet identification tools, print catalogs, and other developers.
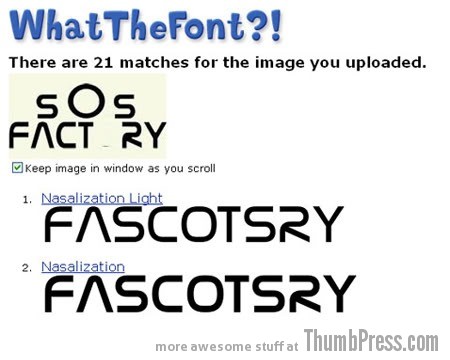
When it comes to internet identifications tools, one of the best is “What the Font!” This font identification engine does a wonderful job of finding a typeface. In the rare case that it fails in doing so, it refers you to typeface forums where online typographers can help you recognizing the font.

clip image001 thumb3 How to Recognize a Font

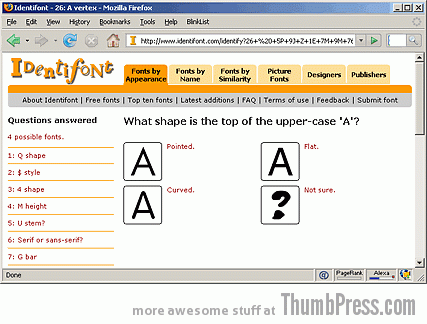
But that is for cases when you have a font image. If you only have a memory of the font, then try out Identifont. This online tool asks you 20 questions about the appearance of the font you are looking for. With each question the search is narrowed down and font suggestions are displayed in the end.

clip image002 thumb2 How to Recognize a Font

Also, if you have the font’s image memorized and can recognize it again if you were to see it, the print catalogs can be a great help. Simply open up a font catalog and start flipping through the pages. For this the most helpful is perhaps Rookledge’s International Type Finder.

clip image003 thumb3 How to Recognize a Font

Finally if all fails, then see if fellow designers and typographers on the web can help you out. Perhaps you remember seeing the font on a certain website and your online colleagues remember which site it was. There is no harm in trying.
Combined, these three techniques will definitely help you find the desired font.

Wednesday, June 29, 2011

Free Up Disk Space By Finding And Deleting Duplicate Files In Windows

1 comments
Are you worried that you might have duplicate files hoarding up hard drive space on your computer? If yes, then do not bother manually searching for those suspected duplicates. Doing so manually can be grossly time-consuming and even inefficient.
One of the best free solutions out there to check for duplicate files is Duper.
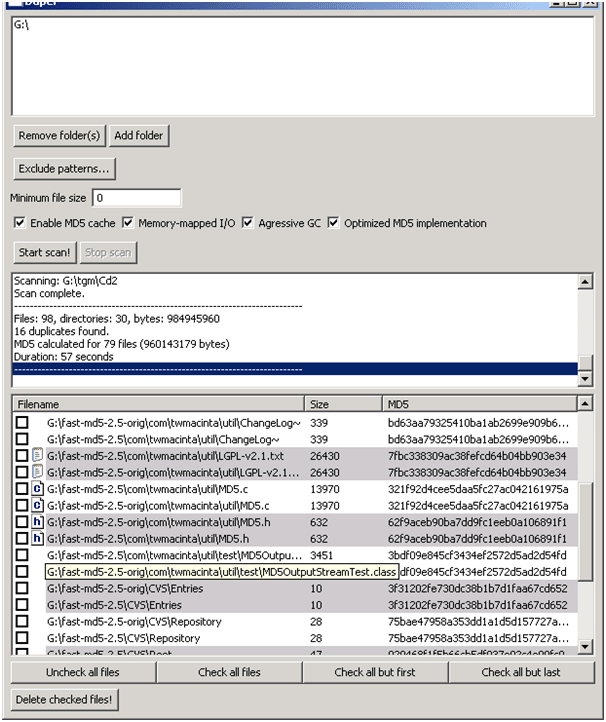
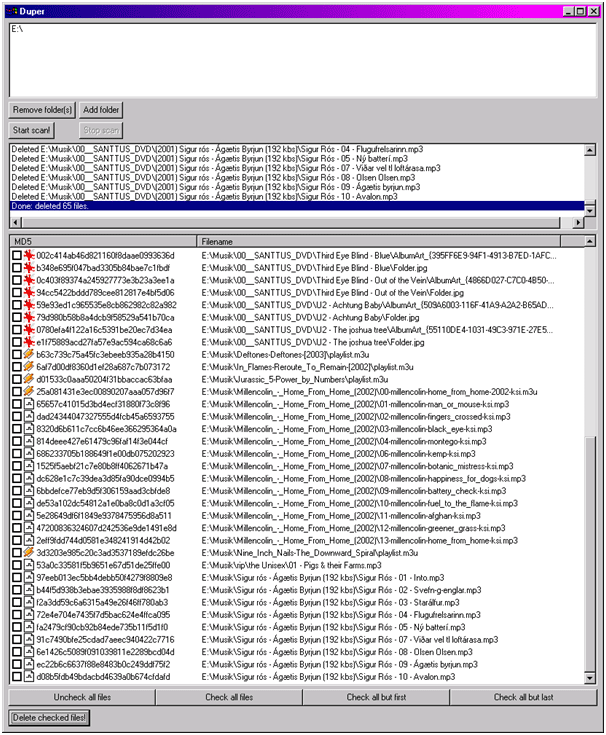
Duper is a freeware program that runs in Java; the only requirement is to have Java installed whether you are running Mac OS, Linux, or Windows. Once we add the directories-to-be-searched in Duper, it looks for files with identical file sizes. For each group of files with the same size, an MD5 sum is computed and then used to determine if they are identical.
duper 377x450 Free Up Disk Space By Finding And Deleting Duplicate Files In Windows
This second check is what determines whether the files are truly identical or not. The user is then notified of the number of detected identical files.
duper1 450x95 Free Up Disk Space By Finding And Deleting Duplicate Files In Windows
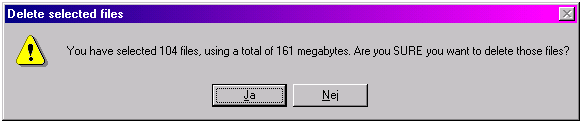
We can then choose to delete the duplicates or keep them as they were.
duper2 371x450 Free Up Disk Space By Finding And Deleting Duplicate Files In Windows
The program’s options can be modified before executing any searches to change the level of detection.
Overall, Duper is a great freeware duplicate file detection solution and will serve most users very well.

Sunday, November 14, 2010

How To Easily Install Windows 7/Vista/XP From A USB Flash Drive

2 comments
Have you ever tried to install an operating system via a USB flash drive?
I had to do it for the first time about 4 months ago. I was helping out a friend with his Windows Vista installation. He was installing Windows on his laptop but due to a fault in his optical media device (DVD ROM) the setup did not load beyond a particular point. Therefore I looked for ways in which I could boot the laptop via a flash drive and run the setup from there.
I had calculated that I did not need to do much more than copying the Windows Vista DVD’s setup files to the flash drive. However as I soon discovered from online tutorials, the USB-installation was not as simple as that. I had to perform a series of complicated steps and most of them were in Command Prompt.
wintoflash2 How To Easily Install Windows 7/Vista/XP From A USB Flash Drive
In the process of leaning USB-installation I also learned that there were different USB-installation methods for different Windows versions (XP, Vista, and 7). But to my relief (and to the relief of anybody wanting to carry out a USB installation) there is a tool that supremely simplifies the process for us. This tool is called WinToFlash.
Let me take you through the process step by step.
Step 1:
WinToFlash works for installation of XP, Vista, and 7. So insert the operating system’s DVD into your optical media device. If you have a disc image, mount it on a virtual drive. Simply having the setup files extracted in a folder will also do.
Step 2:
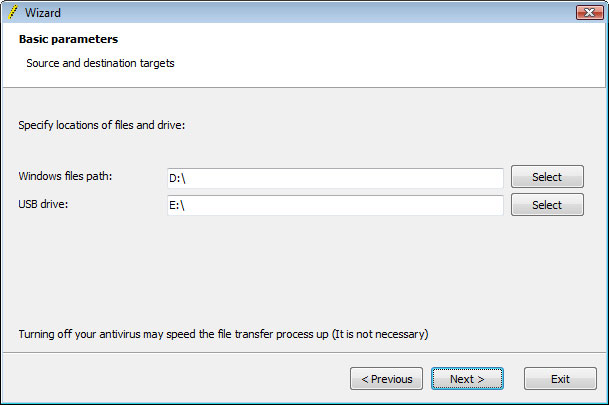
Open up WinToFlash, select the setup files folder (or the drive letter of the disc), and select the drive letter of the flash drive.
wintoflash 450x299 How To Easily Install Windows 7/Vista/XP From A USB Flash Drive
Click on Next.
Step 3:
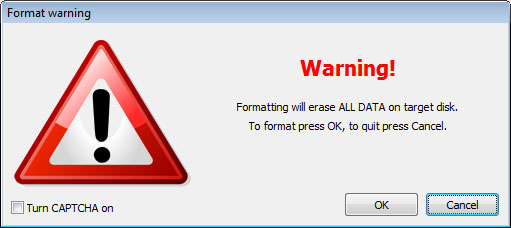
Your existing data on the flash drive will be erased. You will be reminded of this by WinToFlash.
wintoflash11 450x200 How To Easily Install Windows 7/Vista/XP From A USB Flash Drive
If you have not already, then backup your data.
Step 4:
Your files will now begin to copy onto your flash drive. This process will take a while and when it is over, you will easily have obtained a bootable Windows-installing flash drive.
WinToFlash is a freeware program that will surely benefit countless computer troubleshooters and certainly all netbook owners. Get this free application here.

Thursday, November 11, 2010

How to Protect Computer From USB Flash Drive Autorun/Startup Viruses – Wimp

1 comments
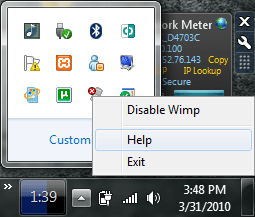
I have recently discovered a developer’s (L. Madhavan) website on which he/she has posted his many useful software projects. One of them was LAN Messenger which I have already told you about. Another one of his Windows programs is Wimp. The name is derived from Windows Malware Protection and is only 200KB large. No installation is required – all we do is extract the EXE file from the downloaded archive and open it.
wimp How to Protect Computer From USB Flash Drive Autorun/Startup Viruses   Wimp
So what exactly does Wimp do? In the developer’s own words:
Wimp was initially designed to remove the many common “flash drive” viruses, i.e. those that spread through USB flash drives; currently, Wimp detects and removes more than 15 of these “flash drive” viruses.
Wimp also prevents malicious programs from disabling Task Manager and Registry Editor, and also prevents changes to many other important system settings.
Protect your system from common “flash drive” viruses, and prevent malicious programs from modifying important system settings or disabling essential utilities such as Task Manager.
In other words, Wimp is a great tool to have running at all times. It neatly sits in our System Tray and notifies us whenever it removes an infection. My suggestion would be to continue to use whatever antivirus program you have to scan your flash drive in addition to Wimp’s scan (one might detect an infection overlooked by the other).
wimp1 How to Protect Computer From USB Flash Drive Autorun/Startup Viruses   Wimp
Madhavan also suggests how to use the program:
To make the best use of Wimp, place it in your Startup folder: Go to Start > Programs, right-click on Startup and select Open. Create a shortcut to Wimp in this folder.
Wimp is a tiny yet useful program that deserves two thumbs up.

Monday, November 8, 2010

Guide: Speed Up Your Internet Connection By Using Google Public DNS

3 comments
Domain Name System, more commonly called DNS, is the online service mapping a web URL to an IP address. Before rendering a webpage, your Internet Service Provider will perform a DNS lookup to find out the URL’s IP address. Because of increasing website complexity the number of DNS lookups increase thereby slowing down browsing speeds.
Google Public DNS Guide: Speed Up Your Internet Connection By Using Google Public DNS
Google offers its public DNS service to the web for faster browsing. Since the search engine giant already caches websites, DNS lookups are significantly faster through Google’s public DNS. Follow the below guides to setup Google’s public DNS on your computer.

FOR WINDOWS USERS

Access your network adapter’s properties. (Go into Control Panel -> Network and Sharing Center)
google dns Guide: Speed Up Your Internet Connection By Using Google Public DNS
Enter the IPv4 connectivity options and change the preferred and secondary DNS server to 8.8.8.8 and 8.8.4.4 respectively.
google dns1 Guide: Speed Up Your Internet Connection By Using Google Public DNS
Click OK and restart your internet connection to apply the new settings.

FOR MAC USERS

Select your network by adapter by going to System Preferences -> Network.
google dns2 Guide: Speed Up Your Internet Connection By Using Google Public DNS
Add the same DNS servers in your adapter’s advanced properties.
google dns3 Guide: Speed Up Your Internet Connection By Using Google Public DNS
Confirm the settings and restart your internet connection to apply them

FOR LINUX (UBUNTU) USERS

Enter you adapter’s properties through System -> Preferences -> Network Connections. Then go to the Wired or Wireless tab (depending on your connection type) and click on the “Edit” button.
google dns4 Guide: Speed Up Your Internet Connection By Using Google Public DNS
Enter the same servers in the IPv4 settings. Separate the servers by a single space.
google dns5 Guide: Speed Up Your Internet Connection By Using Google Public DNS
Click on “Apply” and restart the net connection.
For more information on the matter, you can check out Google’s own webpage regarding its public DNS here.


Monday, October 25, 2010

How to: Increase The FileSystem Memory Cache Size To Speed Up Windows 7

10 comments
If you are running Windows 7 and experiencing slow application response times while running many programs simultaneously, then you most probably need to increase the file systemmemory cache size. Increasing the file system memory cache size often leads to applications running smoother and faster. Below I have explained how you can increase this cache size in Windows 7.
Note: You should go ahead with this procedure if you have a sufficient amount of RAM(computer memory) installed on your computer.
THROUGH THE COMMAND LINE
Firstly you need to be logged in as the Administrator. If you are logged in as any other user, then head on over the Command Prompt shortcut in the Start Menu, right-click on it and choose the “Run as Administrator” option.
memory size1 How to: Increase The FileSystem Memory Cache Size To Speed Up Windows 7
In the command prompt, you can enter the following line to increase the cache size (to increase the limit of paged pool memory):
fsutil behavior set memoryusage 2
memory size11 How to: Increase The FileSystem Memory Cache Size To Speed Up Windows 7
To restore the setting, the following line should be entered in the command prompt:
fsutil behavior set memoryusage 1
THROUGH THE SYSTEM REGISTRY
Access the Run box by pressing the Windows Logo button on your keyboard and the R key. Type in “regedit”
memory size2 How to: Increase The FileSystem Memory Cache Size To Speed Up Windows 7
You will see a window with folder paths on the left. Navigate to the following path:
HKEY_LOCAL_MACHINE \ SYSTEM \ CurrentControlSet \ Control \ FileSystem
In the right pane, locate the entry titled “NtfsMemoryUsage.”
memory size3 How to: Increase The FileSystem Memory Cache Size To Speed Up Windows 7
You can set three values to this entry: 0 for not set, 1 for default, and 2 for increased.
After you have increased the cache either through command prompt or system registry, restart your computer and test if there are any considerable gains in system speed. Hopefully you will experience a noticeable difference but if you do not, it would be a good idea to revert your cache settings.

Wednesday, September 15, 2010

Cara Membuat Instalasi Windows 7 / Vista dari USB Flashdisk

2 comments


Biasanya proses meng-install Windows 7 atau Vista dilakukan melalui DVD dengan DVD-ROM / RW. Tetapi kini dengan banyaknya netbook atau laptop yang tidak menyertakan DVD-ROM, orang kadang bingung bagaimana cara menginstallnya. Solusinya adalah membuat Installasi Windows 7 atau Vista ke dalam USB Flashdisk ( USB Drive). Untuk membuatnya kita bisa menggunakan software gratis Setup from USB


Setup from USB merupakan software gratis (open source) yang ditujukan untuk membuat installasi windows 7 atau Vista ke dalam USB Flash drive. Sehingga Flashdisk menjadi Bootable dan hal ini memudahkan proses installasi bagi pengguna yang mempunyai netbook atau laptop tanpa DVD-ROM / DVD-RW.

Langkah Pembuatan Bootable USB

Untuk membuat bootable USB yang berisi installasi Windows 7 atau Windows Vista, siapkan flashdisk berukuran minimal 4GB. selanjutnya, download dan install terlebih dahulu SetupFromUSB ( 4.8 MB). Setelah di download, extract zip file ini dan jalankan setup.exe. Selanjutnya pembuatannya sebagai berikut :
  1. Jalankan program Setup From USB
  2. Pilih lokasi installasi windows 7 atau Vista. Biasanya drive dari DVD Rom

     
  3. Langkah selanjutnya adalah memilih lokasi yang akan di jadikan bootable, yaitu USB Flash Drive kita. Pastikan data penting di Flashdisk sudah di pindahkan, karena Flashdisk akan di Format (semua isinya dihapus), termasuk semua partisi di flashdisk jika ada


  4. Setelah dipilih, beri tanda chek tulisan warna merah dibawahnya ( I have already backup all data… ), lalu klik Next
  5. Akan tampil konfirmasi pilihan kita, jika sudah yakin, klik Finish
  6. Tunggu proses pembuatan Bootable USB Windows 7/Vista
Setelah selesai, maka USB Flashdisk ini menjadi bootable dan bisa digunakan untuk menginstall windows 7 atau Vista sesuai dengan sumber yang kita buat. Untuk Bisa booting dari Flashdisk, maka BIOS komputer/laptop/netbook harus diatur agar urutan booting pertama kali adalah USB atau removable media.
>source

Tuesday, August 17, 2010

Cara Mengganti/Merubah Format Page Title Blogger yang Tampil di Google Search

6 comments
Kali ini postingan yang akan saya bahas adalah mengenai SEO ( Search Engine Optimization ). Tentu istilah yang tidak asing lagi bagi blogger, tapi ini adalah yang pertama saya buat di blog ini. SEO adalah cara yang dilakukan blogger/webmaster untuk mengoptimasi atau mengoptimalkan blog/website nya dengan teknik/metode tertentu agar halaman/page pada blognya bisa terdeteksi di halaman pertama (page one) pada mesin pencari (search engine), terutama Google search engine.

Dengan cara tertentu kita bisa membuat blog kita nangkring di page one pada Google ketika seseorang mengetikkan keyword (kata kunci) pada search engine paling populer di dunia itu. Salah satu diantaranya adalah dengan mengedit format Page Title agar lebih SEO friendly. Dengan merubah format judul postingan, blog kita akan lebih mudah terindex dan muncul di halaman google search yang kemudian akan menarik dan menambah pengunjung/visitors pada blog kita. Tutorial step by step ini memang tidak jauh-jauh dari mengedit template blogspot/blogspot itu sendiri. Langsung saja kita lihat bagaimana

Biasanya format page title dari blogger kan seperti ini : JUDUL BLOG : JUDUL POSTING, nah agar blog kita lebih disukai oleh google sehingga ujung-ujungnya blog kita jadi rame, kita harus merubah format page title standart itu menjadi seperti ini : JUDUL POSTING | JUDUL BLOG. Caranya cari kode berikut di EDIT HTML ( cara mudahnya di Mozilla tekan ctrl +f lalu copy paste kode dibawah ini):


<title><data:blog.pageTitle/></title>
Kalo udah dapet kodenya hapus dan ganti dengan kode berikut ini :


<b:if cond='data:blog.pageType == "item"'>
<title><data:blog.pageName/> | <data:blog.title/></title>
<b:else/>
<title><data:blog.pageTitle/></title>
</b:if>
Atau kita juga bisa tambahkan beberapa kata kunci ( keyword ) :


<b:if cond='data:blog.pageType == "item"'>
<title><data:blog.pageName/> | <data:blog.title/></title>
<b:else/>
<title><data:blog.pageTitle/> | Kata kunci sobat | Kata kunci sobat </title>
</b:if>
Ganti kode "kata kunci" dengan keyword yang anda incar. Setelah semua selesai jangan lupa di save template :)

Untuk mengetahui cara cepat meningkatkan pengunjung ke blog kita Klik Disini